Spring Tutorial - Spring
Maven + Spring hello world
In command prompt, issue following Maven command :
mvn archetype:generate -DgroupId=com.java2s.common -DartifactId=Java2sExamples -DarchetypeArtifactId=maven-archetype-quickstart -DinteractiveMode=false
Maven will generate all the Java's standard folders structure.
To convert the newly generated Maven style project to Eclipse's style project.
mvn eclipse:eclipse
Then we can import the converted project into Eclipse IDE.
Spring dependency
Add Spring dependency in Maven's pom.xml file.
  <!-- Spring framework -->
  <dependency>
    <groupId>org.springframework</groupId>
    <artifactId>spring</artifactId>
    <version>2.5.6</version>
  </dependency>
Full pom.xml
<project xmlns="http://maven.apache.org/POM/4.0.0"
         xmlns:xsi="http://www.w3.org/2001/XMLSchema-instance"
         xsi:schemaLocation="http://maven.apache.org/POM/4.0.0 http://maven.apache.org/maven-v4_0_0.xsd">
  <modelVersion>4.0.0</modelVersion>
  <groupId>com.java2s.common</groupId>
  <artifactId>Java2sExamples</artifactId>
  <packaging>jar</packaging>
  <version>1.0-SNAPSHOT</version>
  <name>Java2sExamples</name>
  <url>http://maven.apache.org</url>
  <dependencies>
    <dependency>
      <groupId>junit</groupId>
      <artifactId>junit</artifactId>
      <version>3.8.1</version>
      <scope>test</scope>
    </dependency>
  <!-- Spring framework -->
  <dependency>
    <groupId>org.springframework</groupId>
    <artifactId>spring</artifactId>
    <version>2.5.6</version>
  </dependency>
  </dependencies>
</project>
Issue "mvn eclipse:eclipse" again to download the Spring dependency libraries automatically and put it into your Maven's local repository.
Maven will add the downloaded libraries into Eclipse ".classpath" for dependency purpose.
Spring bean
Spring's bean is just a normal Java class. It has fields with getter and setter.
Later we will declare in Spring bean configuration file.
Add the following code to "src/main/java/com/java2s/common/HelloWorld.java".
package com.java2s.common;
public class HelloWorld {
  private String name;

  public void setName(String name) {
    this.name = name;
  }

  public void printHello() {
    System.out.println("Spring 3 : Hello ! " + name);
  }
}
Spring bean configuration file
Next we will create Spring configuration file. In the Spring's bean configuration file, we declare all the available Spring beans.
Create an xml file with name as Spring-Module.xml at "src/main/resources/Spring-Module.xml".
<beans xmlns="http://www.springframework.org/schema/beans"
  xmlns:xsi="http://www.w3.org/2001/XMLSchema-instance"
  xsi:schemaLocation="http://www.springframework.org/schema/beans
  http://www.springframework.org/schema/beans/spring-beans-3.0.xsd">

  <bean id="helloBean" class="com.java2s.common.HelloWorld">
    <property name="name" value="java2s" />
  </bean>

</beans>
The previous file shows a typical Spring ApplicationContext configuration. First, Spring's namespaces are declared, and the default namespace is beans.
The beans namespace is used to declare the beans that need to be managed by Spring, and its dependency requirements for Spring to resolve and inject those dependencies.
Afterward, we declare the bean with the ID provider and the corresponding implementation class.
When Spring sees this bean definition during ApplicationContext initialization, it will instantiate the class and store it with the specified ID.
Change the App.java as follows. In the App.java, it loads the Spring bean configuration file (Spring-Module.xml) and retrieve the Spring bean via getBean() method.
It casts the results from the getBean method then call its printHello() method.
package com.java2s.common;
import org.springframework.context.ApplicationContext;
import org.springframework.context.support.ClassPathXmlApplicationContext;

public class App {
  public static void main(String[] args) {
    ApplicationContext context = new ClassPathXmlApplicationContext(
        "SpringBeans.xml");

    HelloWorld obj = (HelloWorld) context.getBean("helloBean");
    obj.printHello();
  }
}
Compile the source code
mvn compile
Run the code above with the following command.
mvn exec:java -Dexec.mainClass="com.java2s.common.App"
The code above generates the following result.
Download Java2s_Spring_XML.zip
Setup Eclipse
The following screenshots show how to setup eclipse ide to work with Spring.
Import the pom.xml to Eclipse
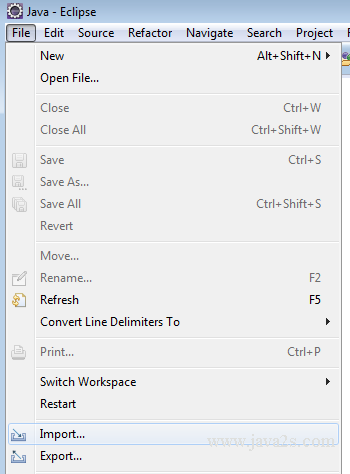
Choose existing maven project.
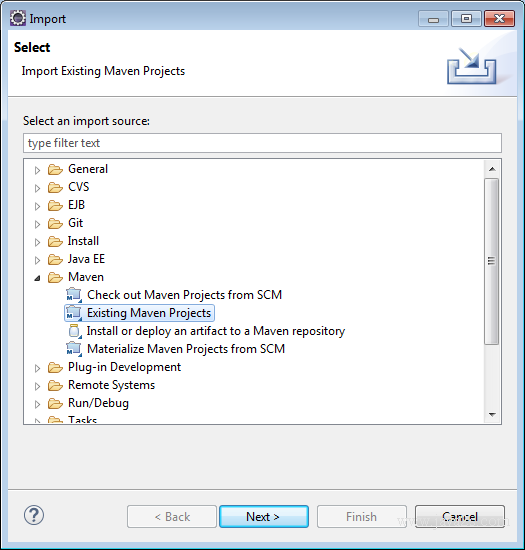
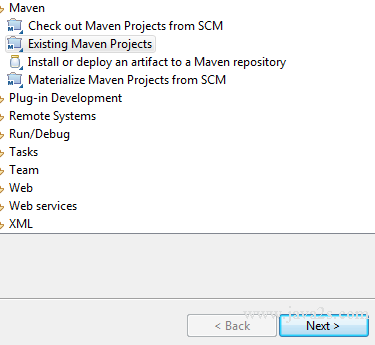
Click Next
Click browse
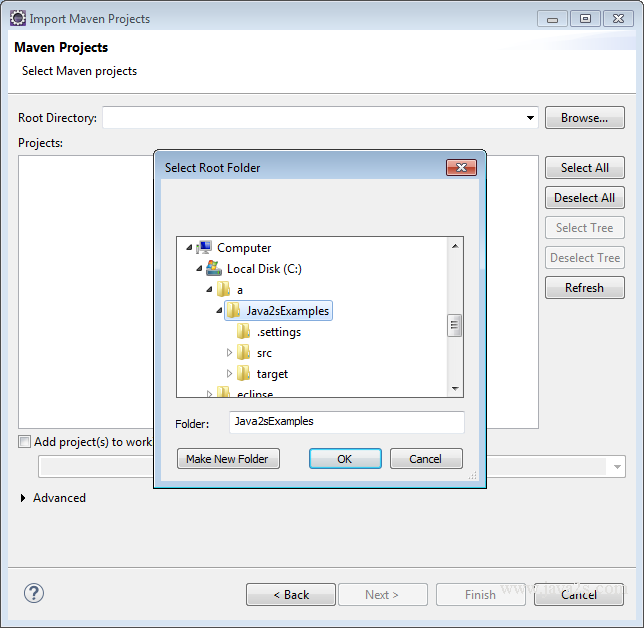
Select project
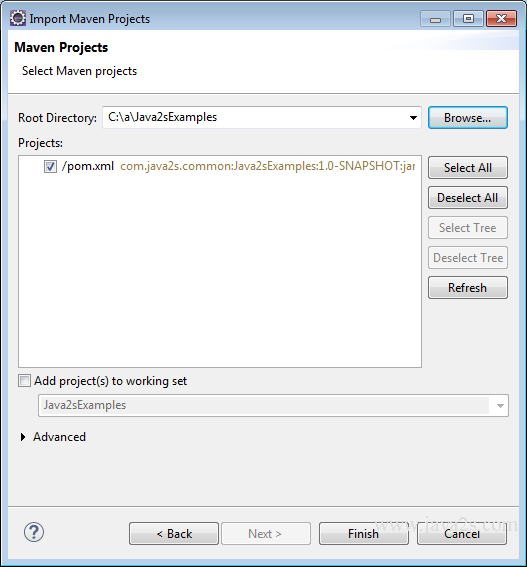
Finish
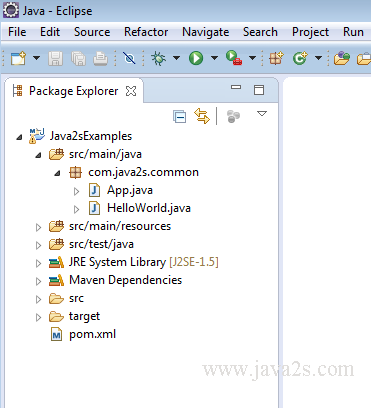
Spring 3 hello world
Use below Maven command to create a standard Java project structure.
mvn archetype:generate -DgroupId=com.java2s.common -DartifactId=Java2sExamples -DarchetypeArtifactId=maven-archetype-quickstart -DinteractiveMode=false
Use the following command to convert Maven style project to Eclipse's style project, and import the project into Eclipse IDE.
mvn eclipse:eclipse
Spring 3.0 dependency
Locate the pom.xml and add the Spring 3.0 dependencies listed below.
The Spring dependencies are available for download via Maven central repository.
<project xmlns="http://maven.apache.org/POM/4.0.0" xmlns:xsi="http://www.w3.org/2001/XMLSchema-instance"
  xsi:schemaLocation="http://maven.apache.org/POM/4.0.0 http://maven.apache.org/maven-v4_0_0.xsd">
  <modelVersion>4.0.0</modelVersion>
  <groupId>com.java2s.common</groupId>
  <artifactId>Java2sExamples</artifactId>
  <packaging>jar</packaging>
  <version>1.0-SNAPSHOT</version>
  <name>Java2sExamples</name>
  <url>http://maven.apache.org</url>
  <properties>
    <spring.version>3.0.5.RELEASE</spring.version>
  </properties>
  <dependencies>
    <dependency>
      <groupId>junit</groupId>
      <artifactId>junit</artifactId>
      <version>3.8.1</version>
      <scope>test</scope>
    </dependency>
    <!-- Spring 3 dependencies -->
    <dependency>
      <groupId>org.springframework</groupId>
      <artifactId>spring-core</artifactId>
      <version>${spring.version}</version>
    </dependency>
    <dependency>
      <groupId>org.springframework</groupId>
      <artifactId>spring-context</artifactId>
      <version>${spring.version}</version>
    </dependency>
  </dependencies>
</project>
Spring bean for Spring 3
The following code contains a simple Spring bean.
package com.java2s.common;

public class HelloWorld {
  private String name;

  public void setName(String name) {
    this.name = name;
  }

  public void printHello() {
    System.out.println("Spring 3 : Hello ! " + name);
  }
}
Spring bean configuration file
The following xml file is for SpringBeans.xml. It is a Spring configuration file, and declares all the available Spring beans.
<beans xmlns="http://www.springframework.org/schema/beans"
  xmlns:xsi="http://www.w3.org/2001/XMLSchema-instance"
  xsi:schemaLocation="http://www.springframework.org/schema/beans
  http://www.springframework.org/schema/beans/spring-beans-3.0.xsd">

  <bean id="helloBean" class="com.java2s.common.HelloWorld">
    <property name="name" value="java2s" />
  </bean>

</beans>
Modify the App.java as follows and run code.
package com.java2s.common;

import org.springframework.context.ApplicationContext;
import org.springframework.context.support.ClassPathXmlApplicationContext;


public class App {
  public static void main(String[] args) {
    ApplicationContext context = new ClassPathXmlApplicationContext(
        "SpringBeans.xml");

    HelloWorld obj = (HelloWorld) context.getBean("helloBean");
    obj.printHello();
  }
}
The code above generates the following result.
Download Java2s_Spring_3.zip