Arranges components either in a row or in a column.
- Box class offers a container that uses BoxLayout as its default layout manager.
- BoxLayout works to honor each component's x and y alignment properties as well as its maximum size.
The BoxLayout class has only one constructor:
public BoxLayout(java.awt.Container target, int axis)
- 'target' argument specifies the container that needs to be laid out.
- 'axis' specifies the axis to lay out components along.
The value of axis can be one of the following:
- BoxLayout.X_AXIS
- BoxLayout.Y_AXIS
- BoxLayout.LINE_AXIS
- BoxLayout.PAGE_AXIS
import javax.swing.BoxLayout;
import javax.swing.JButton;
import javax.swing.JFrame;
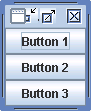
public class BoxLayoutTest {
public static void main(String[] args) {
JFrame.setDefaultLookAndFeelDecorated(true);
JFrame frame = new JFrame("BoxLayout Test");
frame.setDefaultCloseOperation(JFrame.EXIT_ON_CLOSE);
BoxLayout boxLayout = new BoxLayout(frame.getContentPane(), BoxLayout.Y_AXIS); // top to bottom
frame.setLayout(boxLayout);
frame.add(new JButton("Button 1"));
frame.add(new JButton("Button 2"));
frame.add(new JButton("Button 3"));
frame.pack();
frame.setVisible(true);
}
}
import java.awt.BorderLayout;
import java.awt.Container;
import javax.swing.Box;
import javax.swing.ButtonGroup;
import javax.swing.JCheckBox;
import javax.swing.JFrame;
import javax.swing.JRadioButton;
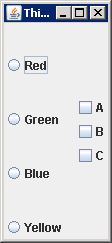
public class TryBoxLayout {
public static void main(String[] args) {
JFrame aWindow = new JFrame("This is a Box Layout");
aWindow.setBounds(30, 30, 300, 300);
aWindow.setDefaultCloseOperation(JFrame.EXIT_ON_CLOSE);
// Create left column of radio buttons
Box left = Box.createVerticalBox();
ButtonGroup radioGroup = new ButtonGroup();
JRadioButton rbutton;
radioGroup.add(rbutton = new JRadioButton("Red"));
left.add(rbutton);
radioGroup.add(rbutton = new JRadioButton("Green"));
left.add(rbutton);
radioGroup.add(rbutton = new JRadioButton("Blue"));
left.add(rbutton);
radioGroup.add(rbutton = new JRadioButton("Yellow"));
left.add(rbutton);
Box right = Box.createVerticalBox();
right.add(new JCheckBox("A"));
right.add(new JCheckBox("B"));
right.add(new JCheckBox("C"));
Box top = Box.createHorizontalBox();
top.add(left);
top.add(right);
Container content = aWindow.getContentPane();
content.setLayout(new BorderLayout());
content.add(top, BorderLayout.CENTER);
aWindow.pack();
aWindow.setVisible(true);
}
}