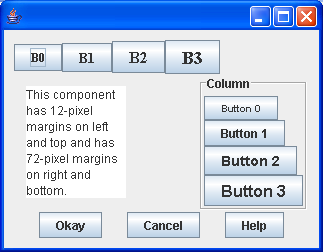
BoxLayout Pane : Layout « Swing JFC « Java


BoxLayout Pane

BoxLayout Pane
      
/*
 * Copyright (c) 2000 David Flanagan. All rights reserved. This code is from the
 * book Java Examples in a Nutshell, 2nd Edition. It is provided AS-IS, WITHOUT
 * ANY WARRANTY either expressed or implied. You may study, use, and modify it
 * for any non-commercial purpose. You may distribute it non-commercially as
 * long as you retain this notice. For a commercial use license, or to purchase
 * the book (recommended), visit http://www.davidflanagan.com/javaexamples2.
 */

import java.awt.BorderLayout;
import java.awt.Font;
import java.awt.event.WindowAdapter;
import java.awt.event.WindowEvent;

import javax.swing.Box;
import javax.swing.BoxLayout;
import javax.swing.JButton;
import javax.swing.JFrame;
import javax.swing.JPanel;
import javax.swing.JTextArea;
import javax.swing.border.EmptyBorder;
import javax.swing.border.EtchedBorder;
import javax.swing.border.TitledBorder;

public class BoxLayoutPane extends JPanel {
  public BoxLayoutPane() {
    // Use a BorderLayout layout manager to arrange various Box components
    this.setLayout(new BorderLayout());

    // Give the entire panel a margin by adding an empty border
    // We could also do this by overriding getInsets()
    this.setBorder(new EmptyBorder(10, 10, 10, 10));

    // Add a plain row of buttons along the top of the pane
    Box row = Box.createHorizontalBox();
    for (int i = 0; i < 4; i++) {
      JButton b = new JButton("B" + i);
      b.setFont(new Font("serif", Font.BOLD, 12 + i * 2));
      row.add(b);
    }
    this.add(row, BorderLayout.NORTH);

    // Add a plain column of buttons along the right edge
    // Use BoxLayout with a different kind of Swing container
    // Give the column a border: can't do this with the Box class
    JPanel col = new JPanel();
    col.setLayout(new BoxLayout(col, BoxLayout.Y_AXIS));
    col.setBorder(new TitledBorder(new EtchedBorder(), "Column"));
    for (int i = 0; i < 4; i++) {
      JButton b = new JButton("Button " + i);
      b.setFont(new Font("sanserif", Font.BOLD, 10 + i * 2));
      col.add(b);
    }
    this.add(col, BorderLayout.EAST); // Add column to right of panel

    // Add a button box along the bottom of the panel.
    // Use "Glue" to space the buttons evenly
    Box buttonbox = Box.createHorizontalBox();
    buttonbox.add(Box.createHorizontalGlue()); // stretchy space
    buttonbox.add(new JButton("Okay"));
    buttonbox.add(Box.createHorizontalGlue()); // stretchy space
    buttonbox.add(new JButton("Cancel"));
    buttonbox.add(Box.createHorizontalGlue()); // stretchy space
    buttonbox.add(new JButton("Help"));
    buttonbox.add(Box.createHorizontalGlue()); // stretchy space
    this.add(buttonbox, BorderLayout.SOUTH);

    // Create a component to display in the center of the panel
    JTextArea textarea = new JTextArea();
    textarea.setText("This component has 12-pixel margins on left and top"
        + " and has 72-pixel margins on right and bottom.");
    textarea.setLineWrap(true);
    textarea.setWrapStyleWord(true);

    // Use Box objects to give the JTextArea an unusual spacing
    // First, create a column with 3 kids. The first and last kids
    // are rigid spaces. The middle kid is the text area
    Box fixedcol = Box.createVerticalBox();
    fixedcol.add(Box.createVerticalStrut(12)); // 12 rigid pixels
    fixedcol.add(textarea); // Component fills in the rest
    fixedcol.add(Box.createVerticalStrut(72)); // 72 rigid pixels

    // Now create a row. Give it rigid spaces on the left and right,
    // and put the column from above in the middle.
    Box fixedrow = Box.createHorizontalBox();
    fixedrow.add(Box.createHorizontalStrut(12));
    fixedrow.add(fixedcol);
    fixedrow.add(Box.createHorizontalStrut(72));

    // Now add the JTextArea in the column in the row to the panel
    this.add(fixedrow, BorderLayout.CENTER);
  }

  public static void main(String[] a) {
    JFrame f = new JFrame();
    f.addWindowListener(new WindowAdapter() {
      public void windowClosing(WindowEvent e) {
        System.exit(0);
      }
    });

    f.setContentPane(new BoxLayoutPane());
    f.pack();
    f.setVisible(true);
  }

}


Related examples in the same category

1.Laying Out Components in a Flow (Left-to-Right, Top-to-Bottom)
2.Use FlowLayout to hold checkBox, Label and TextField
3.Vertical and horizontal BoxLayoutsVertical and horizontal BoxLayouts
4.Box Layout: Adding struts.Box Layout: Adding struts.
5.Using GlueUsing Glue
6.Rigid areas are like pairs of strutsRigid areas are like pairs of struts
7.Demonstrates BorderLayoutDemonstrates BorderLayout
8.Demonstrates GridLayoutDemonstrates GridLayout
9.Demonstrates FlowLayoutDemonstrates FlowLayout
10.A test of the BoxLayout manager using the Box utility classA test of the BoxLayout manager using the Box utility class
11.A test of the box layout manager using the Box utility class 2A test of the box layout manager using the Box utility class 2
12.A test of the OverlayLayout manager allowing experimentationA test of the OverlayLayout manager allowing experimentation
13.Box layout manager using the Box utility classBox layout manager using the Box utility class
14.BoxLayout demo 1BoxLayout demo 1
15.A demonstration of the SpringLayout class
16.A test of the BoxLayout manager using the Box utility class 3A test of the BoxLayout manager using the Box utility class 3
17.BoxLayout AlignmentBoxLayout Alignment
18.BoxLayout alignment 2BoxLayout alignment 2
19.BoxLayout Component alignmentBoxLayout Component alignment
20.BoxLayout X Y alignmentBoxLayout X Y alignment
21.BoxLayout: Glue SampleBoxLayout: Glue Sample
22.Layout: Overlay SampleLayout: Overlay Sample
23.BoxLayout: setAlignmentX setAlignmentYBoxLayout: setAlignmentX setAlignmentY
24.Component AlignmentComponent Alignment
25.GridLayout Demo 3GridLayout Demo 3
26.BoxLayout SampleBoxLayout Sample
27.BoxLayout Demo 3BoxLayout Demo 3
28.Various layoutsVarious layouts
29.BoxLayout Demo 4BoxLayout Demo 4
30.GridLayout DemoGridLayout Demo
31.CardLayout DemoCardLayout Demo
32.Using CardLayout
33.Laying Out a Screen with CardLayoutLaying Out a Screen with CardLayout
34.Laying out a screen with SpringLayoutLaying out a screen with SpringLayout
35.BorderLayout PaneBorderLayout Pane
36.Add buttons to all parts of a BorderLayout
37.A BorderLayout divides the space into five regions: North, West, South, East and Centre.
38.A typical usage of a border layout manager.
39.FlowLayout PaneFlowLayout Pane
40.GridLayout PaneGridLayout Pane
41.Laying Out Components in a Grid
42.NullLayout PaneNullLayout Pane
43.Without layout manager, we position components using absolute values.
44.Simpler CardLayout demo
45.Use SpringLayout to create a single row of componentsUse SpringLayout to create a single row of components
46. Spring Demo 1 Spring Demo 1
47.Spring Demo 2Spring Demo 2
48.Spring Demo 3Spring Demo 3
49.Spring Demo 4Spring Demo 4
50.Spring Compact GridSpring Compact Grid
51.Spring Form Spring Form
52.SpringLayout Utilities
53.Absolute Layout DemoAbsolute Layout Demo
54.A horizontal layout layout manager that allocates horizontal space in specified proportions
55.Laying Out Components Using Absolute Coordinates
56.A vertical layout manager similar to java.awt.FlowLayout
57.A JTextField for displaying insets.
58.A layout manager that lays out components along a circleA layout manager that lays out components along a circle
59.A frame that uses a group layout to arrange font selection components
60.Utility methods for creating form- or grid-style layouts with SpringLayout.
61.A vertical flow layout is similar to a flow layuot but it layouts the components vertically instead of horizontally.